Wednesday, October 30, 2013

Goals and a Witch Doll

 I've done a lot since my last post. Most of it wasn't really worth posting about and I got out of the habit but I have some new goals that I want to be accountable for so I'm going to start posting regularly. I have recently paid off my student loan,(Yea!) and quit my day job (Double Yea!) People ask me what I'm doing with myself and in order to not have to say, "you know, stuff", I have set myself a list of goals to accomplish every day.

 I had the personal tragedy of a miscarriage back in the Spring and I stopped my exercise routine, my get-healthy diet and my crafting for the most part. I just spent my free time lying on the couch eating plain chocolate chips, or putting together puzzles that I would immediately tear apart once finished (I always do that with puzzles anyway, but it felt symbolic somehow at the time.) Basically I wasn't doing anything lasting. My hormones have seemed to settle down lately, I'm not crying all the time anymore. I started crafting as I started feeling better and I feel like I'm just about back to my old self now. I'm also back on the treadmill six days a week and back to watching what I eat and counting calories to try to get healthy. I've been going for about a week and a half and I haven't fallen off the wagon yet.

I also have the goal of writing three pages a day in longhand. This is an old habit that I dropped some time ago but it is helpful in draining the brain of all the garbage and leaving room for creative thought. I do this by writing as fast as I can without editing and having the freedom to write anything because no one is allowed to read it but me. This takes a lot of practice, it isn't natural to turn off the inner critic.

Anyway, my next goal is to draw a sketch everyday. preferably a good one, but it doesn't have to be professional or anything. This goal was inspired by the blog drawingsaudade.blogspot.com. She doesn't post regularly now since she has accomplished her goal of drawing and posting a sketch every day for a year. She was also doing this in the recovery of a personal tragedy. I'm mostly doing it so that all those skills I learned at school that I just finished paying for aren't lost through disuse. I can't promise to post everyday, but I will post my daily sketches at least once a week.

My last goal (at least for now) is to write on my book everyday. My brother, Don just wrote an awesome young adult novel and inspired me to get back to work on my young adult novel. I've worked on it off and on, (mostly off) for years. It's time to get going again and make it long enough and an interesting and well crafted novel.  I won't say much more about it until I've finished because it is much more impressive to say, I wrote a book, rather than I'm writing one.

In the midst of all these goals I'm also crafting and quilting. I've made a couple dolls in the last few months and I made two last year that never made it to the blog so I'll post them soon. So far all the dolls I've made are holiday decorations. I'll post them in the order of their respective holidays.

My first doll is my witch. She is about 13 1/2 inches tall and 16 inches tall with her hat. I modified a pattern I found on online here for the doll and had to make up a pattern for the dress and hat. Luckily I've made a dress or two in my time and had a general idea how to make a bodice. The skirt is a simple gathered skirt with a gathered piece of black lace over the top.


The hat is a cone made from a cereal box and lined with black felt, decorated with the last remnant of the dress fabric, (also the fabric of the the big pumpkin from my Two Crows quilt.) I'm wishing I had put more stuffing in her neck or at least used an armature for support since her hat is little too heavy and her head falls back a little, making her look like she is always looking up at the sky. I have to lean her against things for her look straight.You can't see her feet, but she is wearing black lace stockings and no shoes.


The broom is made from a dowel. I rounded the tip using a pencil sharpener and sand paper and the bristles are from a smaller broom pen I found at Smith's in the Halloween section.


Her face is quite different from the pattern. The chin was too square for my taste so I dimpled the sides by stitching through the head with a long needle and securing the stitches at the top of her head before adding the hair, thus making her face a little more oval. I used black crochet thread for the hair and I embroidered the lashes, eyebrows and lips with embroidery floss and used green glass beads for eyes. They look a little funky, but that works for Halloween. I had started, wanting to make an ugly witch, but apparently I'm not capable of making anything deliberately ugly. I always want to pretty things up.

Coming soon: daily sketches and a Thanksgiving quilt.

Tuesday, July 30, 2013

Gumball Wreaths

 I found a cute craft on a website (instructions linked here) I found through Pintrest and decided to try it for myself. I wrapped a foam wreath form with fabric and then hot glued the gumballs on one by one. WARNING: gumballs and hot glue do not part easily. Once I had a gumball glued down, I could not pull it off again without a pair of pliers that destroyed the gumball and still left the glued portion stuck to the fabric. So although my spacing wasn't perfect there was nothing I could do about it. That's OK with me since, although I try my best, I'm not the type that has to intentionally add flaws to my projects in an act of (false) humility. My flaws are all natural, Baby. Rant warning. (I have heard artists and architects claim to add flaws to their design because no one is perfect but God. Well, yes, that is true, but I seriously get irritated at this claim. I don't think the Lord expects people to intentionally hold themselves back from perfection, since our natural mortal state will do that for us. Intentionally adding flaws and pointing them out to claim humility is just old style humble-bragging. I'm so good, I had to add flaws!)
 [Clears throat, steps off soapbox.] 
ahem.

 The gumballs on the original site were all painted one color, which was very cute, but I liked all the colors so I just sprayed them with clear acrylic for a finish.


 I'm not sure how well this would hold up outdoors even with the acrylic coating, so I have it hanging indoors.


Here's my smaller Valentine's Day version.


They are so cute I could just eat them. No need though, I have lots of leftover gum.
Anyone need any gum?

Wednesday, July 24, 2013

Vine Tables

After I finished my penny table that replaced my glass coffee table, I was wanting to replace my matching glass end tables. I decided not to make penny end tables since I was out of epoxy and that stuff is pricey. I found a matched set of mildly damaged end tables at the thrift store for five dollars each. I fixed the loose legs, sanded and primed. They are the type with a diamond shaped wood grain in the center of the table top and therefore hard to paint. I chose to use the rest of my oil rubbed bronze spray paint left over from the penny table for the tops and painted the legs in teal. I wanted to stencil a design on the top in teal as well. I bought a stencil and practiced on cardboard over and over and eventually decided I have zero talent for stenciling. It seems a little silly and I know this will sound like a humble-brag. I have an art degree and can draw and paint my own designs just fine, but I really wanted to stencil since it is supposed to be fast and easy. After some frustration, I gave up and hand painted the tables. They have an identical design so I'm only showing one of them. I had to paint the design over three times to not be transparent over such a dark color.

For any one hand painting or stenciling a design, I make this recommendation: to not do it over a spray painted background as the margin for error is very slim. If you mess up, it would be easier to touch up with regular paint, than wait for the whole thing to dry, then tape over all but the offending spot and spray to cover. I was very careful to not have to do that, but like I said, I had wanted a quick craft and this took some time. After the tables dried I coated the top in polyurethane and called it good.


 A couple weeks later I got this sweet little seventies style bedside table for ten dollars at the thrift store. I needed it hold up my printer. (since the top of our desk is apparently dedicated to holding all kinds of loose papers.) I used the same teal paint and dirtied up the surface by dry brushing on some wood stain, then varnished over the top. I use the drawers to hold printer paper and scratch paper.


 Next time: Gumball Wreaths.

Thursday, May 23, 2013

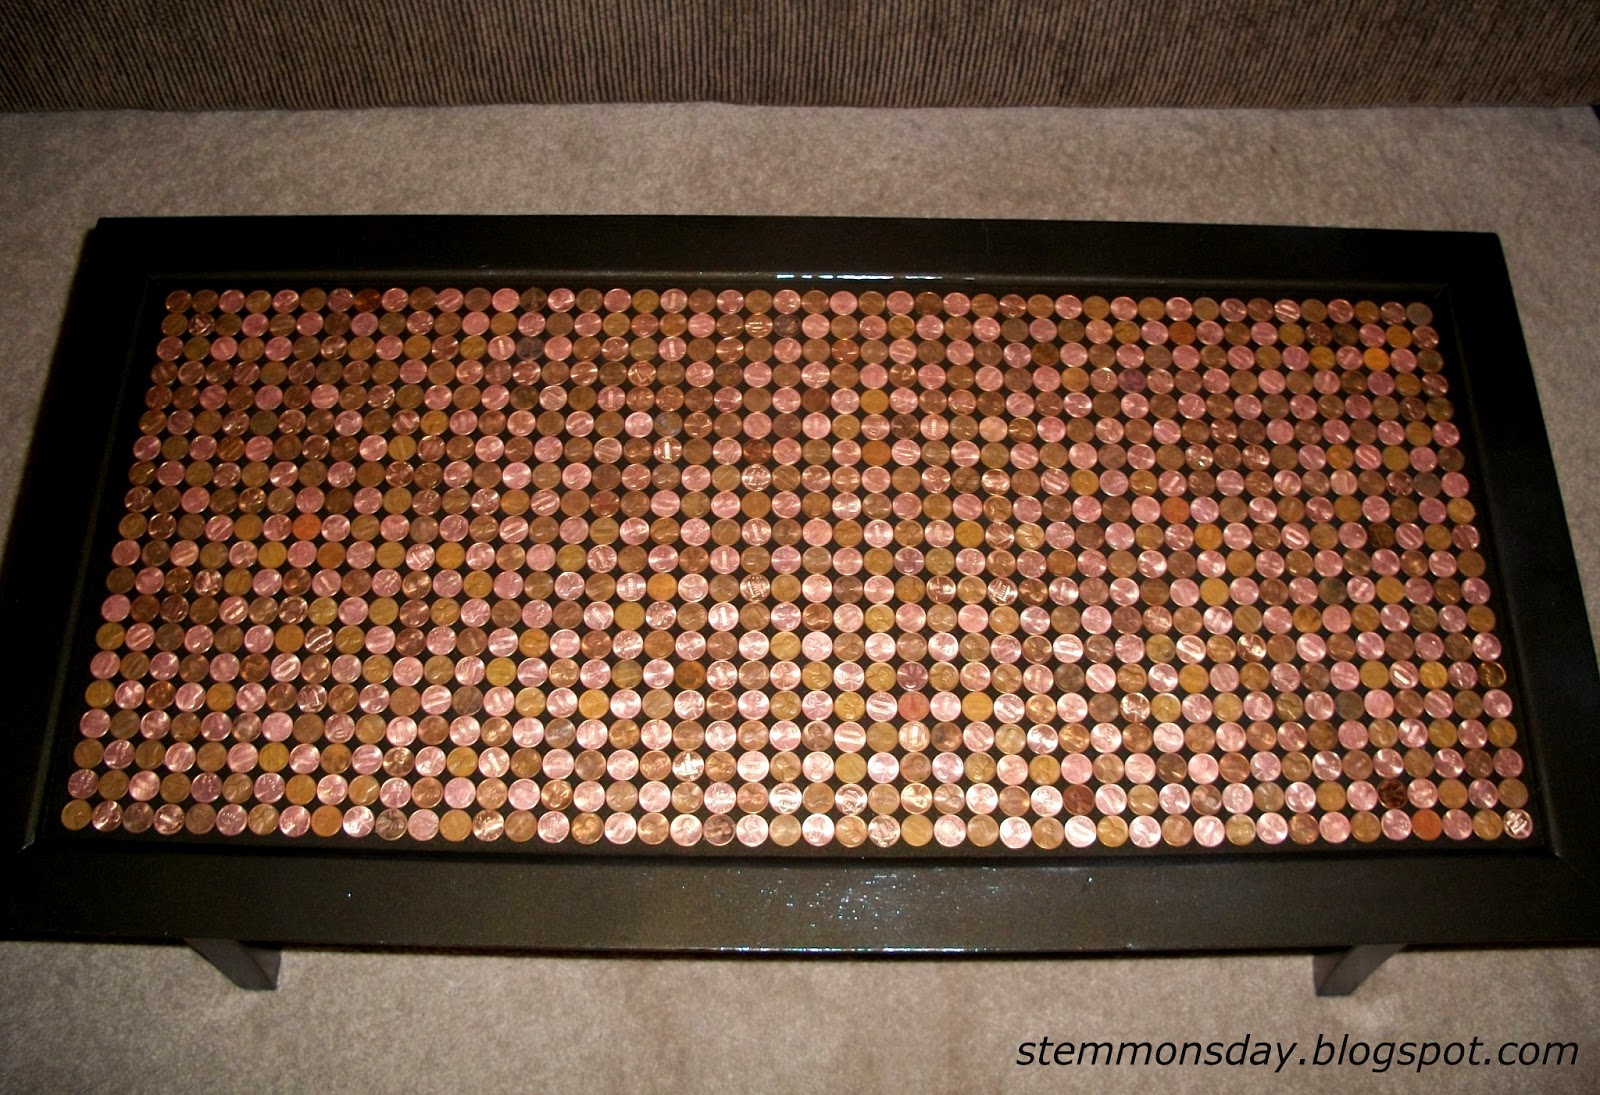
Penny Coffee Table

 Last summer I was into all kinds of crafts, mostly quilting, but I did many others as well. I found a furniture one online that looked like fun and even looked like I could do it on my own. I'd been wanting a new coffee table any way. My coffee table was cast iron and glass. My neighbor's two year old little boy was here and promptly got  up on the table and started bouncing. We got him down before he hurt himself, but I thought maybe a glass table isn't the best table to have. I'd seen several different online instructions for penny and epoxy finishing for tables, counters, and even floors. I decided to try for a coffee table. The best instructions I found are linked here.

At the local thrift store I bought a wooden table with a lip on the edge. (So I wouldn't have to worry about messy epoxy drips.) I didn't like it's red color against the pennies so I primed and then painted it with oil rubbed bronze spray paint. I got my pennies from around the house and from the bank. Pennies oxidize easily and really none of them were very shiny. I separated the darkest colors from the brighter colors, then shined the brighter ones with Tarn-X.

I arranged the pennies checker board style, alternating the shiny and the dull. If you stand back from the table you can only see the shiny pennies, which is kind of cool. The instructions I followed had the pennies nesting and in a non-pattern pattern. I find that kind of non-pattern exhausting since my eyes are always looking to connect patterns. I made my pattern a very obvious one and I lined up the pennies straight so I wouldn't have to trim any of them to fit in a rectangle.

Penny table with flash.
Penny table without flash.
 After I lined up the pennies along the side and the bottom of the rectangle I started gluing them down as I went. I used Gorilla glue and when I changed my mind on a part of the design, the glue wasn't dry yet so the pennies weren't too hard to remove. When the pennies were all in place I mixed the epoxy and poured it over the top.  The epoxy was the most expensive part of this craft, but I price checked and bought it online for the cheapest I could find. Mixed epoxy does get a lot of bubbles in it and you need carbon dioxide to get them to the surface before they set. I don't own a heat gun so I poked the bigger bubbles with a toothpick and breathed hard on the smaller bubbles. I know some breathing technique from singing so I could get a good long steady blast of air going at the epoxy bubbles. This took a long time though, and I breathed hard for so long that I nearly threw up. I gave up at that point and there are still a few tiny bubbles left in my table.

The epoxy hardens with a glass-like finish and keeps the pennies from oxidizing further. I love my coffee table, though it does weigh three times as much as it did pre-penny finish.

Next time: vine painted end tables.

Thursday, May 16, 2013

Jacob's Window Quilt


The Bountiful temple was dedicated when I was a teenager. I helped with the open house and I remember thinking how beautiful and peaceful it was. I especially loved the stained glass windows. My tour guide described the design as influenced by native American designs and inspired by Jacob's vision of an angelic ladder in Genesis. (I'm not sure the inspiration by Jacob's Ladder part is true, as I've never heard anyone else refer to the window design that way.) I promised myself I would be back. I kept that promise and have been back many times. Several times I would find myself just staring at the windows. I loved the design and it occurred to me I could use a piece of the design and make a quilt. I first came up with a great queen sized design. Then I remembered, Oh yeah I still slept on a twin sized bed, and as nice as it would be to make another quilt for the unforeseeable future, I wanted a quilt I could use right away.


I was renting a room in a house with some awesome girls. I was in the mood for change and I decided to redecorate my bedroom as it was all I had to myself. I chose to use the colors found in this sweet little tissue paper sun I bought at an art fair.


 I color coordinated the whole room, I even  made new artwork for the walls and used these colors. I think I must have been feeling down, so I surrounded myself with bright warm colors. I made the quilt very light weight so I could use it year round. I bought lavender sheets so they would match. All the strips in the quilt are the same width, two inches not including the seam allowance. I used two reds, two yellows, one orange and one purple fabric. The colors in the temple windows change from top to bottom and from one window to another, but I couldn't afford that much time or fabric so I stuck with one set of colors. I may make another someday and have the colors change from one corner to the other.


The finished picture is a little blurry, but the quilt is a bit big for photographing indoors. 
The quilt is 88 x 61.5 inches.


I wanted to call the design Jacob's Ladder after the supposed inspiration for the window design, but that name is already claimed for a different quilt pattern. I decided to call it Jacob's Window. I entered it in the Bountiful Handcart Days Arts and Crafts Competition and won third place. The Bountiful temple is still very important to me. Alan and I were married there in 2011.


Tuesday, April 30, 2013

Indiana Mission Tie Quilt

You have been called to serve. You will say goodbye to your family and friends and spend three inspiring/exhausting weeks in the Missionary Training Center. Then you say goodbye to your new missionary friends, go to the airport and fly


 to  the

Where you are greeted and driven to the mission home in Carmel, Indiana. You will have some additional training for a day, and the next day you will meet you new companion, go your assigned area, and get right to work in spreading the gospel.

 You will rise early each morning, often before the sun.

You will study the scriptures every morning for two hours, one alone, and one with your companion

Depending on the week you will either ride your bike,

or drive a mission car, reminding yourself this is the Lord's car and you will drive carefully.

You will pray around fifty times a day, realizing you depend on the Lord for success, and mental, spiritual, and physical sustenance.

You will knock  on many doors, and sometimes, people will let you in.

Step around the concrete goose on the porch.

Try not to be distracted by, or trip over the many pets.

 Serve and love the people with open hands and hearts.

Keep a positive attitude.

Take the opportunity to testify of the truthfulness of the gospel whenever possible, it will invite the Spirit to touch the hearts of investigators and will strengthen you.

Teach from the scriptures, nothing is so powerful as the word of God.

 Remember why you are here, to serve the Lord's children, to love them with the pure love of Christ, and to help bring their souls to Christ.

Before you know it, it will be time to get on another plane and go home. You will take home experiences you could have not had any other way and you will leave a piece of your heart behind.

The finished quilt is 60 x 60 inches.

 My first mission president's wife would cut off the tie of every departing missionary at our Departure meeting, where the missionaries on their way out would share one last testimony before flying out the next morning. She had these tie fragments made into a lovely, orderly quilt, with each missionary's name embroidered on a strip of fabric sandwiched between two strips of their tie. My second mission president was of course under no obligation to continue this tradition. He didn't even know about it at first, but someone let him know soon enough, and he liked the idea, so the tie cutting continued.

I was ill on and off throughout my mission. I did my best and kept a positive attitude to the point of delusion. My dear president had an interview with me a month before my scheduled departure. He told me some of my former companions let him know how hard missionary work was for me and how frustrating it could be for them. I just didn't always have the energy to continue work and had to take a nap here and there when the exhaustion would catch up with me. (and I honestly had no idea how often I had to do this.) He gave me the choice to go home early or to serve in the mission office for the remainder of my mission, where I could take a nap when needed and not be wracked with guilt for not working harder. The idea of going home early was breaking my heart, so I opted to stay at the mission home and work in the mission office.

I spent the rest of my mission staying with President and Sister Quist. I just loved them, and got to know them pretty well. I volunteered to make the mission quilt and Sister Quist was very excited, since she hadn't known who to ask. She gave me carte blanche with the design. After I went home to Utah she would periodically send me a package filled with severed ties and some scarves from the sisters. Elders usually would wear their ugliest tie to their departure meeting, knowing it would end up chopped. Sisters sometimes wore a tie too, just so it could get cut off, but really so they would have something to contribute since not all sisters wear a scarf. I, myself, used a bright blue piece of fabric that had been tied to my luggage so I could identify it at the airport. I included every tie sent to me, except the one entirely made of duct tape. I have to admit the ugly ties were my favorite, you do get tired of handsome red ties after a while. Some of the ties were used more than once, but only early on, when I didn't have as many to choose from. The white, mint green, and royal blue jacquards are all additional fabrics from the store I used for the backgrounds of the larger blocks.

This was my first applique quilt and I learned as I went. I would unpick every tie, remove it's center, iron it, judge if I could use it's front or if the backside of the fabric would suit my needs better. Then if it was part of the applique I used fusible webbing to hold it in place so I could sew it on. The silk/polyester fabrics in ties are highly unsuitable for machine applique, at least with the somewhat antique machine I had at the time. I did try to machine sew them, but the machine would pull the pieces all out of shape, so all of the applique is sewn by hand. This is time consuming, but I had time. The Quists didn't need the quilt until the end of May, 2004. I had over two years to finish it. I did need the time though since I never knew what ties, or how many I would receive every few months. The Quists sent me a check now and then to cover assembly materials.

I got the layout for the quilt from a folk art quilt book that I unfortunately don't own anymore. I also got the animal, tree, leaf, barn, and house designs from the same book. The rest of the quilt is my own design, and I honestly didn't think of this until I finished, but I should have used sycamore leaves rather than oak. Indiana is known for its sycamore trees. Oh well. I got one last huge shipment of ties at the end with ties from all the missionaries that weren't leaving yet but wanted their tie included in the Quist's mission quilt. These ties make up the border and fillers between the designed blocks. I backed the quilt with a black jacquard fabric and my mom and sister-in-law helped me quilt it together. I embroidered my name on the back in red as an artist's signature. Then I took all these pictures and over-nighted it to the Quists. (They wanted it before leaving so they could show it to the missionaries at their last set of zone conferences.) Sister Quist called me after the quilt arrived and she was so sweet about it, crying happy tears. The work was totally worth it.


Next time: Jacob's Window Quilt

Tuesday, April 16, 2013

When All the Morning Stars Sang Together Quilt

This was my first really ambitious quilt. I mean ambitious in size and in the fact that I designed all the blocks and that I entered it into a crafts show. I was working at a fabric shop, which was great for inspiration, and for spending all my wages. (I still have lots and lots of the fabric I bought while working there.) I spent all my downtime at work designing quilts on a little graph lined notebook. After I had worked there for a little over a year, my Bishop called me to serve a mission. I knew I would do it as soon as the words were out of his mouth. The Spirit hit me like a truck and I accepted.

I started right away on filling out the paperwork, but the going wasn't easy. I had some long running health issues and had to go to the doctor a lot. after a couple months I finished the paperwork and my Bishop mailed it in. Then the waiting started. I had a lot of nervous energy so I filled my evenings piecing a quilt. I would work six hours at a stretch, hardly stopping to eat or drink. A week after my papers were sent in, I received a phone call. The mission office wanted a second opinion on my health. (They have to deal with a lot of medical issues for missionaries and wanted to know if I could take the exhaustion of missionary work.) I would need to see another doctor. I made an appointment that day, but the second doctor couldn't fit me in for another month. So now I really had time and even more nervous energy.

I had never pieced a quilt design with anything more complicated than squares. Oh well, I was in for it now. The grid layout is traditional and I'm not sure if anyone else had used these exact star designs, but for me they were completely original and mine. My inspiration was Job 38:7 "When the morning stars sang together, and all the sons of God shouted for joy". I had been getting theme inspiration for quilt designs for some time from poetry and scripture. ( Although I've made only a very few of those quilts so far.)

 I made each star design in two different color combinations and used every color on the wheel but green.

Each star design was used six times in the quilt, three for each color combo.


I really love how yellow and orange just pop against blue and purple.


Then I grouped three of my shooting star design blocks around each corner for a total of twelve blocks.


  The finished quilt has thirty 13 x 13 inch blocks and measures 87 x 102 inches.
 

I finished the top of the quilt in very early June of 2000. A lady in my ward was in charge of the Bountiful Handcart Days Art and Craft competition and suggested I enter something. The due date was June 20th. I scrambled to finish the quilt in time. I did most of the quilting but Mom helped and called in the troops. (The sweet ladies from the Bountiful 12th Ward Relief Society and a few aunts and cousins.) We finished just in time to enter, well almost, I requested and was granted an extension since binding the quilt took about six hours longer than expected.

 The quilt was submitted just after I received my call to serve as a missionary for the Church of Jesus Christ of Latter-Day Saints in the Indiana, Indianapolis Mission. I was to leave in six weeks. My youngest brother Jack and I were going to the Missionary Training Center just two weeks apart and we were both very excited and helped each other study and prepare. So when it came time to go to the awards ceremony for the show, my mind wasn't really on it. I was surprised to find out I had won the blue ribbon! Wow, that was a first. Later they announced the people's choice award, and I won that too! The show's run didn't end until after I left for the MTC so Mom picked up my quilt for me. It sat in storage for years after I got home since I still slept on a twin sized bed. I didn't make a really big quilt again for this reason until I helped with Jack's wedding quilt.

A million years later when Alan and I got married, I had a ready made quilt and Mom didn't have to hustle to finish one for me. We used it for the first few months of marriage until we got our tax refund and we bought a bed set with a king sized bed. Now my quilt is on the guest bed, at least until the bed gets kicked out for a crib.

Next time: The Mission Quilt.